Showing posts with label crafts. Show all posts

Wednesday, April 29, 2015

Teeny tiny ribbon roses!

Don't tell anyone...I should be working on my thesis right now! But procrastinating writing can be exhausting, so I needed a break from finding excuses to take breaks from work ;) Plus, this post has been in the works for almost a week, so it's time to set it free!

So here's my tutorial for making tiny ribbon roses, which I need for a little project I'll share in a later post. I sought high and low online and didn't quite find what I wanted, so I kind of cobbled a hybrid from tutorials from Ravings of a Mad Crafter and Solo Un Tip. (Just giving credit where it's due.) Enjoy!


Materials

  • thread
  • cloth onto which you will build the rose: I found felt to be a great material, but you can also use organza, or a bulky fabric that is easy to make large holes in.
(I am using contrasting colors in my materials here so it's easier for you to see, but you will most likely want to use the same color of ribbon and thread.)

Part 1: Make the star-shaped frame


1. Cut a 10" piece of each width of ribbon, at an angle so it'll be easier to... 2. Thread each ribbon through a needle. 3. Pull the thin ribbon through the fabric:

4. On the back side, tie a simple knot so it stays put:

5. Flip the fabric over. Sew the ribbon back to the other side by making what will be the center of the rose, so that you have a stitch that is roughly 1/2" long. It will look like this; you are looking at the front side of the fabric where the rose will end up:

6. Use something like a ballpoint pen or dull pencil to make the center hole bigger:

7. Continue sewing the ribbon in and out until you form a 5-sided star. Each arm of the star should come out of that center hole. I found it best to go in this order (you're looking at the front here):


8. When you're done forming the last arm of the star, you can sew or glue down the end of the ribbon on the back side of the fabric:

Part 2: Form the rose

9. Insert the wider ribbon through the center hole of the frame until it peeks through. If you're having trouble, you can use a needle to pull it through:

10. Pull it all the way through. On the back side, make another knot to keep it in place:

11. Now the fun part! Twist the needle around several times:

12. Wind the part of the ribbon that is coming out of the frame into a tight little circle, and you'll find that the ribbon forms a nice little rose center all by itself:

13. Making sure the center stays put, take the needle under one of the arms in the frame and pull it all the way through:

14. Continue building the rose by making 1 or 2 twists in the ribbon, and pinning it down to an arm of the star. Skip everyone other arm as you go around so that the "petals" are big enough.
15. After about twice around, it'll look something like this:
Then this:

16. There are a couple of ways to finish this.  You could glue the end of the wide ribbon down with hot glue, but I chose here to sew it in place with a bit of thread again:

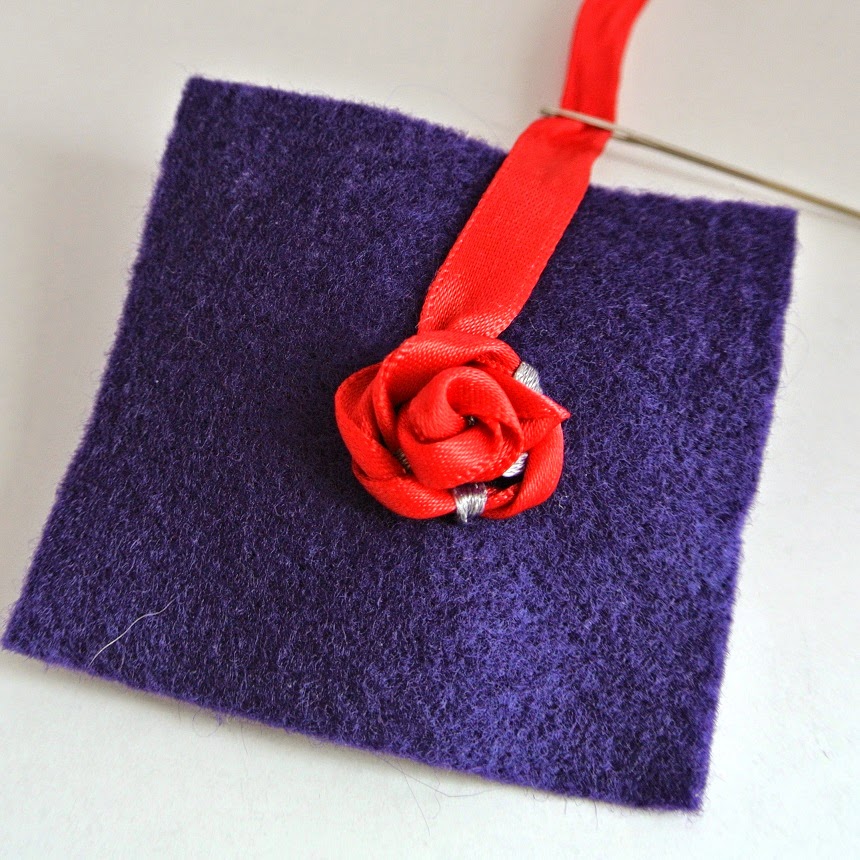
17. Trim your ribbon and step back to admire your work!

You can see the frame ribbon is already pretty well hidden here, but it looks great with matching colors:

I haven't tried it yet, but I'm sure this wouldn't be too hard to scale up using wider ribbon to make larger roses.


So I wrote most of this during our long flights when we took a trip to Boston this past weekend for a wedding, while our brother- and sister-in-law (bless them!) watched the little monsters. They couldn't be happier, especially because it means they had their big fluffy monster friend Blue to play with all weekend! Hope you all enjoyed your weekend as well...the next one isn't too far away now!!

 Follow

Saturday, April 11, 2015

Circuit board coasters

Yeeeessss weeeeeeekennnnnnnd!

Moving on...

A really long time ago, the hubby brought these circuit boards home from the office because they were going to throw them out, and he thought I could do something cool with them. Bless his heart, he knows me so well!

They were the perfect size and shape to turn into coasters, but then thought twice when I learned that a lot of circuit board solders and other components have trace amounts of toxic materials that are bad for you to come into direct contact with. (Which I should have already known, considering I learned about some of this stuff in college learning materials science.) So these sat in a junk box for a couple years.

But I finally just got around to ordering these self-adhesive laminating sheets from Amazon so they could be sealed up for safe use! I just cut the sheets to size and sealed them up. (I may not have retained much from my MIT education, but I'm sure enough that a layer of adhesive and plastic will keep me safe in this situation.) There's a slight hint of some air bubbles because the surface isn't smooth, but it's pretty hard to see unless you really look for it.


You could really use these adhesive sheets to make coasters out of anything that isn't already waterproof; even just pretty paper. Uh oh, watch out - nerd alert! My desk has some spiffy new coasters now.


 Follow

Sunday, March 22, 2015

Champagne cage chairs

Hi.  I have a problem.  I keep everything.  Sometimes it's basically trash.


But.
Here's a rare case I'm glad I'm borderline hoarder!  I've been collecting champagne wire cages (you know...the little metal thingy holding the champagne cork in place) for a looong time, and we drink a lot of champagne, as evidenced by my wine cork napkin holder bordered by champagne corks.  I finally found a cute use for them!  I basically followed these simple instructions from about.com.

Then I played around with different chair backs, and finished off the chairs with a coat of my trusty silver spray paint for a uniform look:


They're pretty adorable lined up in a row on a shelf.  I think ultimately, these would be great keepsakes for special occasions...I'd just need some oil pens so I can write the occasion and date.  Anyone out there have any recommendations for good oil pens?

Can't believe this week is already over - hope everyone got to do some lounging this weekend like Elba did!
Follow

Sunday, March 1, 2015

Decoupage notebooks

Happy weekend, everyone! It's been such a quiet and relaxing weekend - and my evil cold illness of zombieness is finally going away! Wish today would go on forever...and can you believe it's already March?!

In preparation for a move later this year, I'm trying to get rid of as much junk and clutter as I can long before I even have to think about packing.  I had a few random notebooks lying around, but with covers that made them practically unusable - they either needed a makeover, or a home in the recycling bin.  This included some composition books bought on clearance to qualify for a minimum online purchase to get free shipping (so random, I know), which I had planned on recovering them but never got around to it.  I also had a panda-cover notebook was an impulse buy, but I realized that I can't use it in any serious situation without looking like a 4 year old!  Some Lisa Frank unicorn stickers and I'd be all set.

This is what I used to bring new life to these notebooks: Mod Podge Original 16-Ounce Glue, Gloss Finish.  To refresh my memory on the decoupage process, I checked out this post from A Diamond in the Stuff.

Here's the finished products!


Follow

Saturday, February 21, 2015

Mason jar soap dispenser DIY

Ugh. The common cold is a cruel invention of nature.

To ease some of the pain associated with the awful cold I came down with this week, I had to solve something around the house!  Our fancy high-tech sensor hand soap dispenser in the kitchen broke down the other day, so it needed a replacement.  Now, I don't think I've emphasized this enough, but I'm a HUGE fan of trash-to-treasure/upcycling/call it what you will. (a.k.a I'm cheap and too lazy to go to the store.)  So I wanted to try to pull this off using only stuff I already had at home.

First, the jar.  That was easy: dug this little gem out of our recycling bin.  Note "Classico" pasta sauce actually has a pretty nifty mason jar behind the label, which came off pretty easily with the scrape of a razor blade and some Goo Gone. The expiration date printing comes right off with acetone nail polish remover.  And, it's nice not to jump on the Ball mason jar bandwagon like everyone and their mother ;)


Next, the pump.  I have a stash of identical shampoos and conditioners (...thanks, Costco...), so just took the pump from one of them.


Punching a hole in the lid big enough to fit the base of the pump was the hard part, and I almost caved here and bought a 3/4" drill bit.  Crisis averted: I ended up using the biggest drill bit I had to start the hole, then a Dremel with cutting attachment to cut slits, and pliers to peel them up to make the hole bigger:


Then sealed the pump into the lid using a hot glue gun:


Thankfully, trimming the pump tube to fit the jar was a lot easier...just good ol' scissors.


Wrapped up the stem with newspaper, and sprayed the top with spray paint.  (Had some leftover from when I painted heating vent floor registers to match our carpet.)


Now the best for last!  Faux mercury glass.  Pretty much followed this nice tutorial from Vintage Fragment to a tee.  Just did 2 layers, and really happy with the results.


So here we are!  Yes, I realize the side-by-side comparison doesn't quite make sense because the jars are different sizes, but I'm sick, ok?!  Cut me some slack.


Having a functioning soap dispenser in our kitchen is SO great...maybe it'll keep the hubby from catching my cold.  Wouldn't that be nice, Elba?


(She says yes.) Hope everyone reading stays healthy!

Thursday, February 5, 2015

Spray painting to freshen up photo frames

Happy ~almost~ Friday, everyone!  

I've been completely obsessed with spray paint lately, and apparently so has everyone else on the Pinterest-osphere.  It started for me when I picked up a fresh can of silver paint for my mirror makeover project, and it snowballed from there.

A couple days ago, I was cleaning out some clutter, and gathered a bunch of random picture frames from random places that actually look even more hideous when lined up all in a row...


 They were screaming for a fresh coat of paint!  In they go into my new trusty very high-tech spray paint stage (a.k.a. a cardboard box on its side):


After a couple coats, here's the finished product, with a souvenir beer coaster from Prague in one frame:


Now of course I need to find nice photos now to go in the others, and something pretty to glue on top of the one on the right (it used to have a decorative thingy that fell off after a couple moves). Will update you when I do!


Lastly, I just want to say thank you to all of my friends who have been supporting me in this little project in the past year.  Actually, I just realized it was exactly one year ago today I made my first post!!! (And a special thanks to one reader in particular who encouraged me to step things up...you know who you are :)  This week has been a tough one to get through, and it's nice to know I have so many great friends in real life and some supportive readers (if only a few for now!) here.

If anyone has any suggestions for future posts, comments, constructive criticism - I'd love to hear them all!

And to close today: I was trying out different lighting for that last picture, and a silly dog snuck into one of the photos. See if you can spot the Casper!


Friday, January 2, 2015

Refinishing an old mirror frame

Ok I really need to stop this bad habit of finishing 97% of a post and then letting it sit in draft stage for weeks.  In 2015, I will try to be better at finishing things!  It's been a terribly relaxing and lazy last couple of weeks - I feel like the same kind of useless blob I turned to during winter vacations in grade school.  Here's one of about 10 projects I did at the end of 2014 that I hope to eventually tell you guys about...

I bought this mirror at a garage sale for a few bucks a couple of years ago because I thought it was beautiful, even though the finish was not.  And despite that, I still hung it up in my staircase right away and lived with the dull, fake-looking, slightly orange-y gold finish and all of the scratches that were on it.  (Pardon the lighting, but it's just so much easier to let my phone sync up to my dropbox so I don't have up manually upload!)


My last can of silver spray paint had clogged up a while back, because I wasn't careful enough to spray it upside down for a few seconds to clear the nozzle after each and every use. Lesson learned.  I got a different kind of one this time, and I quite like it:


Now, the question of how to tape off the mirrored surface.   I thought about taking the frame apart from the mirror, but the back looked pretty solid and I didn't want to mess with it.  The thought of putting painter's tape around all those curves frightened me.  So instead, I cut up little curved pieces of paper that very nicely fit in the gap under the frame, and held them down with bits of painter's tape.


After wiping off all the dust on the frame and using plain ol' drywall spackle to fill in the big gouges, I gave it a couple of coats of the silver spray paint.


I then realized that a piece of the patterned border was gone, and it was kind of ruining things for me.  I very probably should have just done the following with the drywall spackle, but for some reason I thought doing homemade puffy paint would be a good idea.  So I mixed 1 part flour to 1 part salt, and added enough water to get a pretty thick paste that would hold its shape.  Then, I put it in a plastic bag to act as a teeeeny piping bag.  The result was better than the starting point, but not very durable.  (It also occurs to me now that if I had mixed mod podge into this pasty mixture, it probably would have been a lot sturdier and less crumbly. And less crummy!)

Anyway, I gave it one last good liberal coat of silver, and let it dry.

Final step: the black detailing! Just use regular acrylic craft paint and a skinny little paintbrush to get into all the nooks and crannies of all the pretty flowers and designs.  (This process was easier with the paint diluted with water about 1:1.)  Then, wipe over it with a rag to remove the black paint from the raised areas, and you'll see how this brings in a lot of richness and depth.  Work in small sections so you don't have paint drying prematurely before you wipe it up the way you want it.

After removing the paper, I scraped with a razor blade to remove errant specks of silver and the previous gold remaining on the mirror itself.

And ta-da! What do you guys think?  I have another mirror in my house that may fall victim to this makeover, will post when I do it! Might take a couple years to get to it, though...


I have absolutely zero excuse this time to include this pic of dogs perched on barstools, other than it's pretty adorbs:


Monday, December 8, 2014

Wine cork napkin holder

I have this really horrendous habit of starting posts and not finishing them. And I'm considering making myself finish all my draft posts before starting any more new ones.  But I have so many cool projects I've recently done and am itching to write about, that I'm not sure I have the discipline to do that!

So anyway, I made this wine cork napkin holder about a forever and a half ago, and I'm just now getting around to posting.  Better late than never, right?  As you may know, I save every.single. wine cork that gets used in my house.  And we apparently go through a lot of wine, so that means a lot of cork crafts!

This one is pretty straightforward: build the base first with wood glue, making sure it's a bit bigger than the napkins you have, and let it dry.  Then build up the "walls" on 3 sides.


After everything is dry, stand back and admire as you allow your napkin holder to perform its intended function!


For another cool cork craft and the wood glue I like use for corks, check out my tutorial on how to make a wine cork trivet.

And to close: We got a new doggy bed that we were worried was too small for both the dogs to use, but they pulled through and managed to snuggle up together in it! :)  My excuse this time - this random story is related to the napkin holder because the bed is shaped kiiiinda like the the napkin holder - am I right!!?